14 October 2014

Holiday Planning (part 2)

I don't know about you, but I always have the intention on sending out holiday cards with a family newsletter in them.  This has yet to happen.  So this year I am planning ahead!  I put together a printout to list out all of my family and friends whom I would like to send out our holiday cards to.  (Because, you know, it is way more official if it is actually written down, then I will have to do it!)

To continue on the Holiday Planning series, I have included another free printable: Holiday Cards.
Use this printable to keep track of all your friends and family members you will be sending your cards and letters out to.

Along with this freebie, I am going to offer some advice from my own experience in receiving letters over the years and things I have online about composing a letter.

A holiday newsletter about your family is a great way to let your family and friends have a glimpse into your past year, and it should be just that, a glimpse.  Keep your newsletter simple and include major events that happened over the year.  Receiving a multiple paged newsletter can be very daunting and discourage people from reading all the way through it.

Always start off the letter in a positive note.  Most often people tend to start off these letters with something like, "I can't believe how fast this year went by!"  Time does go by fast, and most of us want to savor our lives and the reminder of how quickly it passes us by isn't the happiest of openings in a holiday letter.  Some alternatives for starting out your letter are, "We are so thankful for all our friends and family that have shared in our memories over this last year!" or "What an amazing journey these past twelve months has been for our family!"

If you have children, consider allowing them to write a paragraph about their year.  You may want to brag about her making the honor roll, but she may be more excited to share about winning that one volley ball tournament.  Even if they are too young to write the words down themselves, you can transcribe what the little ones want to say.  Don't worry about editing their stories, it will be from the heart and family will think it's adorable you have included them in the letter composing.

A great alternative to a traditional letter is an infographic holiday card or letter.  This is a great way to keep it simple and interesting for your readers.  Here is an example I have found from minted.com:
Year in a Nutshell Holiday Photo Cards
(source: Minted.com)
Infographic holiday letters are a neat way to simplify your year in review and make it easy and fun for your readers to understand what you were up to.  Websites, such as minted.com and shops on Etsy, can put these together for you.  Or, if you know your way around a design program, you can put together one yourself and save some money.

What are your plans for holiday cards this year?


02 October 2014

Holiday Planning (Part 1)

It may be the beginning of October, but can you believe it is also the start of the Holiday Season?  I was in Target the other day (my favorite store ever!) and right next to the Halloween section was the Christmas section.  It seems like every year it starts earlier than the previous.

Seeing all the holiday decorations made me start thinking about planning our family's own Christmas for this year. . . and out came the Holiday Budget printable!  It is so important for my husband and I to budget out our Christmas or we (okay, let's be honest, I) will over spend immensely.  The best way for us to budget out for all the gift giving and parties is to spread it out over several months.  It doesn't seem as big as a financial hit when we do a little at a time.
When budgeting for your holiday season, I have some helpful tips to help you stick to it.  The first one might seem overly obvious: Stick to your budget!  Set limits for all gifts you plan on giving and keep track of what you spend.  It is too easy to just impulse buy and then realize you have over spent by the end of the holiday season.  Setting out a limit for each person will be helpful while out shopping and most likely keep you from overspending.

Shop around before you buy.  Shopping online is a great venue to allow price checking and ensuring you are receiving the best price.  It is also more convenient (where else can you shop in your pajamas while watching your favorite holiday movie?) and reduces the impulse buys the brick and mortar stores setup everywhere you look.

Always try to use debit before credit.  Spend what money you have, not what money you don't.  Sure, if you use the store credit card you may save a little bit of money up front, but if you do not pay it off in time you will pay way more in interest charges.  Some stores allow you to make payments in store at the registers.  If these stores also have discounts for using their branded credit card, it makes logical sense to charge to the card and turn around and make the payment right then.

Keeping these few tips in mind, here is a freebie to help you keep your holiday on budget this year!  Click here to download and use your Holiday Budget planner.

Here is my planner for this year.  
(Sorry for the low picture quality, it was late and my camera battery wasn't charged!)

Up Next: Holiday Planning Part 2 - With another freebie!!

How do you like to stick to your holiday budget?


30 September 2014

My Etsy Story

I have been wanting to start blogging again (well, really just for the third time), and sharing my Etsy story seems like a good place to start.  My shop is an outlet for all of my organizing.  I use just about every printable item I sell on the site in my everyday life.  In this digital age, I still much prefer writing things down on something that looks pretty; much in the same way I prefer to have a book in my hands then a tablet.  It's just not the same.

I started my Etsy shop back in 2011.  I had just had my second son and was realizing how much money we did NOT have!  To save money I began to coupon.  I was not an "extreme" couponer by any means, but I did coupon a little crazier than the average person.

Quickly I became frustrated with my DIY coupon binder.  I had downloaded the free printouts from the most popular website and placed them in the clear protective sheets.  The frustrating part about this was the coupons, which were placed into baseball card sheets, would cover the tabs causing them to be hidden.  So I decided to make my own binder with tabs.  Back in college I used to put together my projects with hand made divider tabs and bind them with coil binder, so I knew I could make my own tabs.

After making my own binder and doing a few in home training seminars for couponing, I decided to turn it into a business.  I opened my Etsy shop near the end of 2011, my youngest was six months old.  Back then my shop was called Sweet Savings.


These are a couple of the binders I used to sell in my shop.  The custom tabs matched the vinyl binders I designed through a third party company.


After only a couple of months I got burnt out.  The amount of time I put into each binder was taking away from time with my boys.  When we moved in August of 2012, I put my shop on vacation and didn't open it up again.

My supplies still take up half of our master closet.  I have more empty coupon binders then I know what to do with.....maybe a future give away!  I ended up designing and making myself a home management binder with some of my leftover supplies.  While my shop was up and running, I offered some digital printables for coupon shopping.  These items did pretty well, and they spawned the idea for my next Etsy venture: home management printables.

I love designing and keeping things looking pretty.  This new adventure has been so much fun.  I have evolved from just home management printables to wedding planners, pregnancy journals and have even done party printables for custom orders.

Here are some of the fun stuff I currently have available on my shop:


My Etsy shop has given me an outlet for my creativity and my family a little bit more financial freedom.  I thoroughly enjoy designing these prinatables and love organizing my own life with them.  I have met some wonderful women through my shop and been able to share my knowledge with fellow entrepreneurs.

What a blessing to be able to do what I love and share it with all of you!


24 August 2013

My DIY Chore Charts


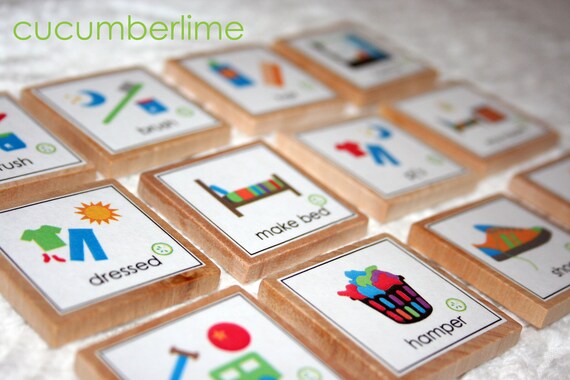
With the boys getting older, we have been wanting to give them more responsibilities and create chores for them to do.  I, of course, have a fascination with creating forms, lists and trackers, so I had to come up with a chore chart!  I browsed Etsy first, to see if there were some out there I liked to just buy and avoid making my own.  I found some from Cucumberlime, but the pricing was a little high once you have two boys you need them for.

Daily Routine Set (12) BOY
Daily chore set from Cucumberlime

They also have some dice that have chores, rewards and consequences on them.  I LOVE that idea, so I decided to give those a go as well.  My mom used to make a game out of cleaning when I was little.  She would put the names of rooms in a bowl and my sister and I would take turns picking a piece of paper.  We would then hurry and clean so we could draw out another room!  (Sneaky mom, really sneaky!)  So I think a game with the dice will be fun for my boys.

So after the realization I couldn't afford everything I wanted, I set out to make my own.  Based on the size description on listing, I started to design my own pictures for the the magnets.  I looked all over the internet to find graphics that I liked, but I couldn't find matching designs for all the different chores I wanted.  I decided to give it a try making my own....and I think they turned out pretty well!!  I am impressed with myself.  Download these for your own project, sorry, no girl theme yet.

Shark themed for Landon.  

Car themed for Braden.
Once I got my designs down, I headed to one of my favorite places, Michaels.  There I found wooden tiles that were perfect for my chores and the wooden dice.  I figured Mod Podge would be the way to go for adhering all of the images to the wood.  I never gave Mod Podge a try before, but I watched some videos about it to make sure it would do what I need it to do.  I got the gloss variety.  Well, hold on. . .first I purchased something made by Mod Podge called Dimensional Magic, I thought that was what I needed.  It wasn't, so I had to make another trip to Michaels.  But I ended up watching a video on that, too, and it turns out it adds a dimensional effect which is very cool.

I printed out the images on plain paper and cut out each square on the dotted lines I created in the image.  


Each image was then applied to the wooden tile with a layer of Mod Podge using a foam brush.  Then a layer of Mod Podge was applied to the top of the image.  

Tile right after Mod Podge is applied.
Tiles with Mod Podge dried.  They are clear and glossy.


After about 15 minutes, the tiles were dry.  Then I put on a layer of Dimensional Magic.  It goes on cloudy, but dries completely clear.  This stuff takes much longer to dry, I let it sit for a day before I touched it.  You also need to ensure that it dries on a flat surface, or it will be lopsided.  You could choose to just do the Mod Podge and leave the tiles flat, just be sure to add a layer or two of Mod Podge to ensure the picture will stay on.

It goes on cloudy white, but will dry a crystal clear layer.


After they had dried for a day, I used E6000 glue to adhere rare earth magnets to the back of the tiles.  Another thing I had never tried before, but have read about it on other blogs before.  This stuff is amazing!!! It adheres to practically anything and is strong.  I used the smallest magnets I found, because earth magnets are strong.  And they did the trick nicely.


Now that I had all my magnets, I had to have a magnetic board to put them on.  Being the person that I am, I couldn't just have a piece of sheet metal up.  It just doesn't look pretty.  I have seen pictures of magnet boards covered in fabric in frames and I thought that would be perfect!  I could pick out some fabric that matches our playroom and hang them up in there with a wooden initial for each frame.  Soooo, back to Michaels I went.  I found some matching open frames, two of them 8 x 10 frames and one 11 x 14.  I would use the larger one to hold all the chores; the smaller ones would be used for each boy to put on the magnets when they complete a chore. 

I then went over to Lowes and purchased a piece of sheet metal. Then off to JoAnns to find some fabric.  I spent a good hour in there, but couldn't find exactly what I was looking for.  I had previously seen some place mats at Target that I liked and the design matched the curtains in the playroom, so I jaunted over there.  I was able to purchase just one place mat for a few dollars.

My dad, the handy man that he is, was able to use his brute strength to cut the sheet metal down to size for me.  He also came up with the brilliant idea to use push pins to hold the metal in the frames.  It definitely doesn't look pretty from behind, but it is doing its purpose of holding the metal in.


I was able to cut the mat up, the front design side was cut in two and was perfect size for the 8 x 10 frames.  The back lining for the place mat was used in the 11 x 14 frame.

Kids play room table AFTER with chore charts
Kids play room table BEFORE


I purchased wooden letters for the boys' initials.  I planned on painting them, but after we painted the playroom grey, I really like the contrast of the white on grey.


Some more photos of it....its just so pretty...


Aren't they cute?  I hung them in the playroom where the boys could easily reach them and move the tiles around on their own.  Each day if they complete their chores, they get to put up the reward tile for that day (the shark for Landon and car for Braden).  If at the end of the week they have every day filled, they get to roll the reward die.


So far it's working out great.  After this project, I have been addicted to Mod Podge! I cannot believe I have gone this long in life without using it before.  I am Mod Podging everything now, even some clip boards for work and my stapler (which may have been a bit overboard, I admit it).


18 August 2013

About Me

Welcome to Life. More Organized.!  My name is Katie and I am excited to get to share a little about myself and why I am eager to share my organizing tips and tools with you.

I have been married to my wonderful husband, Richard, for eight years.  We have the two most adorable little boys in the world (well, I may be a little biased).  Our life is chaotic to say the least.  I work full time at a big box store and my husband is a manager at a retail super center.  With two boys, ages 4 and 2, our house gets from pristine to pig sty in less than five minutes!!  This blog is my journey of attempting to keep my Life. More Organized.

When Richard and I first got married, we had been in the process of purchasing a home a few towns away from where we grew up.  Complications kept arising in the building of the house, but we were patient for a while.  We spent the first five months of our marriage living with my parents while we waited for the house to finish (not something I recommend if you want to keep your sanity).  I finally hit my limit and wanted to keep my relationship with my mom (apparently no matter how old you are, if you live at home, mom always wins!), so we got an apartment.  

This was the most beautifully, cute, little apartment you ever saw!  It was just a one bedroom, but it was brand new and we were right next to the gorgeous, resort like pool and spa.  At the time I had just started to work at my still current job, and was only working part time, around 8 hours a week.  I didn't have much to do but clean.  And boy did I ever clean!!!  This is where I like to say my obsessive cleaning disorder started.

The apartment was decorated like it was the model.  I love to decorate!!!  I cleaned everyday.  I dusted and vacuumed and scrubbed.  And when I say I vacuumed, I mean I VACUUMED !  I vacuumed the carpet and the furniture.  We owned a green microfiber couch and when I vacuumed it, there would be nice lines of where the brush went up and down.  

It got to the point that I couldn't stand it if my coffee table was moved slightly by an inch or if a friend came over and sat on my couch then left a butt print when they stood up.  I had to take pillows off of the couch before people came over so they wouldn't sit on them.  My friends might have looked at me funny.

After three years of living in the apartment, we gave up on our house we were waiting for and found a row house in our home town.  I found the houses by accident.  I was actually trying to go to model homes of the houses behind the row house, but saw the line of houses and was intrigued.  My mom and I went into the row house model and I fell in love!  I always imagined I would move to a big city and lead a high class lifestyle (I can dream right?), and this house felt like that dream in my small hometown!  I told my husband I wanted it and he let us buy (he would give me the world if he could).


Our house is the second door from the right.  It was three stories.
This house was perfect for the two of us; it had no yard to up keep and was a two bedroom, one and a half bath.

After only 10 months of living in our new home, we welcomed our first son, Landon (whom we were told was going to be a daughter, but that's a whole other story!).  Here is where my obsessive cleaning and having a child started to collide.  At this time I was working full time and having a little baby in the house was becoming a challenge to keep up on the house work.  Two years after Landon, we welcomed our second little man, Braden.  I thought one child was difficult to keep up with, I had now idea how much more work was involved with two (I would not trade it for anything).  


Our quaint little house became much more crowded with two little boys roaming around.  While the house itself was a decent size, 1500 square feet, it was spread out onto three floors.  The first floor was the garage and a small living room, which we never used.  The second floor was our kitchen and family room with a small powder room; this was the floor we were in all the time.  And third floor were the two bedrooms, both the same size, a small office nook, a laundry closet and a full bath.

When Braden was born, we converted the small office nook into a nursery.  It had just enough space for his crib and a dresser.  We were afraid the new baby would wake up older brother if they were in the same room.  Once Braden could stand up we moved him into the bedroom with Landon, because the office nook was open to the balcony of the stairs.

By this time I had given up all hope on keeping a clean home.  I got to be lazy.  I think my side of the bedroom was covered in the same clean laundry for over a year.  My husband was great during this time.  He would clean the house like crazy.  It was almost like we had switched roles; he was now obsessively cleaning.

Somehow, by the Grace of God, we were able to purchase a new home and sell our first.  We moved into an amazing new home with a large yard (hard to find in our neck of the woods in a new lot).  We gained 1,000 square feet!  We moved into this home in August of 2012.  I cannot believe it has been a year already!  And I am just realizing that I don't have any pictures of it yet....gotta fix that.

This past year I have been figuring out how to balance my extreme cleaning with my busy life.  I have realized that I cannot control everything, and my kids, as messy as they are, are the biggest blessing in my life.  I have discovered how to live with organized chaos.  This is my LIFE.  MORE ORGANIZED.